Floor Marking Tape Guide: Colors, Widths and Install Steps

Your aisles have shifted, staging has spread, and the old lines no longer match how people work. This floor marking tape guide helps you choose colors, widths, and materials before you order rolls that won't suit your floor.
Start with the route, not the tape. A bright line won't fix a tight forklift turn, and a heavy-duty backing won't bond to cleaner residue.
Table of Contents
- Floor Marking Tape Colors and What They Mean
- 2 Inch vs 4 Inch Floor Tape Widths
- Vinyl, PVC or Heavy Duty Floor Marking Tape
- How to Prep and Lay Floor Tape Step by Step
- Floor Tape Layouts for 5S Workplaces
- Shop Floor Tape Tools and Supplies in Stock
- Floor Tape Questions Answered Before You Order
Floor Marking Tape Colors and What They Mean
OSHA doesn't require yellow for every aisle. Its aisle-marking enforcement guidance allows appropriate marking methods when they clearly define aisles and employees and vehicle operators are trained to recognize them.
Use a shared color system rather than letting each department choose its own. A worker moving from receiving to production shouldn't have to guess whether an orange box means inspection or cart parking.
Common floor marking colors and their meaning
| Color | Common use | Basis |
|---|---|---|
| Yellow | Aisles, traffic lanes, physical hazards | Convention. OSHA allows other aisle markings if they're clear and workers recognize them |
| Red | Fire extinguishers, hoses, emergency equipment | Convention, often tied to fire equipment identification |
| Orange | Inspection areas | Convention. Confirm the meaning in your site legend |
| Green | Safety stations and first-aid points | Convention, aligned with ANSI safety colors |
| Blue | Raw material storage | Convention. Confirm in your site legend |
| Black | Work-in-process (WIP) locations | Convention. Confirm in your site legend |
These are common warehouse conventions, not a federal layout rule. ANSI Z535.1 is a uniform safety color system many sites reference, but a warehouse storage legend isn't the same as a safety-color standard. In particular, orange inspection markings shouldn't be confused with warning signs.
Build your written site legend this way:
- List every zone type, including temporary holds and emergency access.
- Assign a color to each meaning, without conflicting uses.
- Write a one-page legend listing color, zone, and the person responsible.
- Post it at the entry and train new hires, contractors, and vehicle operators.
Keep the palette small. Extra colors make the floor harder to read when workers can't reliably explain what each means.
2 Inch vs 4 Inch Floor Tape Widths
Use 2 inch tape for aisles and most production lines, and 4 inch tape for forklift lanes and high-traffic areas as practical starting choices. Choose by viewing distance and traffic, then check the actual operating clearance.
OSHA's aisle-marking interpretation identifies 2 to 6 inches as the typical marking-width range, considers 2 inches or more acceptable, and says aisles should generally be at least 3 feet wider than the largest equipment used, or at least 4 feet wide.
Floor tape width by use
| Width | Best use | Trade-off |
|---|---|---|
| 2 inch | Aisle boundaries, most production lines, pedestrian lanes | Uses the least floor space. Less visible from a distance |
| 4 inch | Forklift lanes, high-traffic zones, long sight lines | Better visibility. Paired boundaries take more floor space |
| 6 inch | Wide lanes, very large equipment | Most floor space used. Check the product spec for availability |
The comparison below shows the visibility difference, not a guarantee that a route has enough clearance.
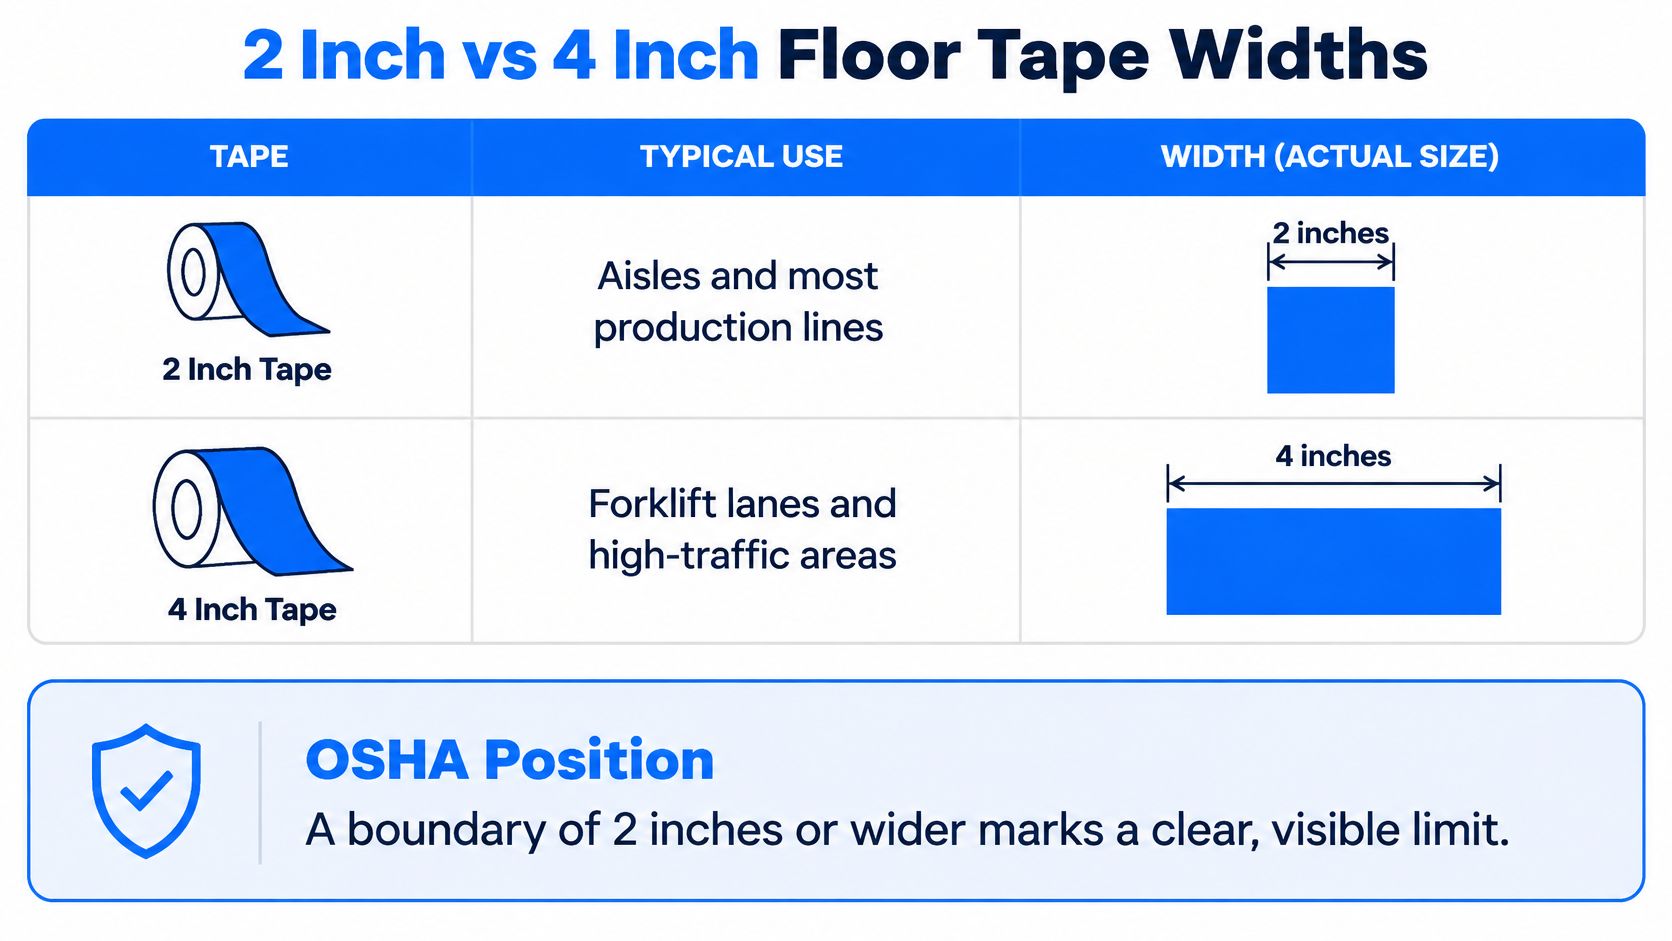
Measure the usable route
For a planning example, two 4 inch boundaries placed inside a fixed aisle footprint consume 8 inches of nominal width. If your drawing measures between tape centerlines, the clear space will be smaller than that dimension suggests.
- Measure the widest forklift and its load, including overhang.
- Check the turning envelope, not just straight travel.
- Select boundary width for visibility and traffic.
- Measure the clear route after installation.
When comparing 4 inch rolls in the floor marking tape, shapes, and applicators category, include intersections and pedestrian crossings in your plan.
Clearance check: Pallet overhang, rack uprights, sprinkler obstructions, and temporary staging can narrow an otherwise straight aisle.
Recheck the route after any layout change. Tape doesn't replace physical separation where pedestrians need protection from vehicles.
Vinyl, PVC or Heavy Duty Floor Marking Tape
| Tape type | Typical traffic | Best fit |
|---|---|---|
| Vinyl | Foot and light cart traffic | Offices, low-traffic aisles, budget zones |
| PVC | Mixed foot and cart traffic | General aisles, staging zones, workstation outlines |
| Heavy duty | Pallet trucks and forklifts | Forklift lanes, dock approaches, high-wear floors |
For a low-traffic zone, vinyl can be a practical choice when replacement cost matters. PVC-labeled industrial tape may suit general aisles and staging areas, provided the product information supports that use.
Vinyl and PVC aren't separate performance grades. PVC is a type of vinyl, and sellers may use either term. A PVC label alone does not establish that a tape will last longer.
For pallet trucks and forklifts, select tape rated for that traffic. A wheel crossing a straight line puts different demands on tape than a wheel turning directly on it. Test the hardest-working part of the route before choosing a product for the full floor.
Check these conditions before ordering:
- Traffic type: Identify whether the line will see pedestrians, carts, pallet trucks, or forklifts.
- Traffic frequency: Estimate forklift passes per shift at the proposed line.
- Floor condition: Account for cracks, texture, coatings, and worn patches.
- Replacement work: Factor in removal labor and lane closures.
- Clean removal: Confirm the adhesive is suitable if the layout may change.
A thicker backing alone does not guarantee better performance. Edge shape, adhesive, floor contact, and resistance to turning wheels all affect how tape holds up.
Test a sample roll in a working lane before ordering a pallet. Expose it to normal traffic and cleaning, rather than judging it in a quiet corner.
How to Prep and Lay Floor Tape Step by Step
Floor contamination can defeat even a durable tape. Before upgrading the roll, check whether oil, moisture, cleaner residue, or loose coating caused the existing line to lift.
Use this visual sequence to plan the work area and tools.
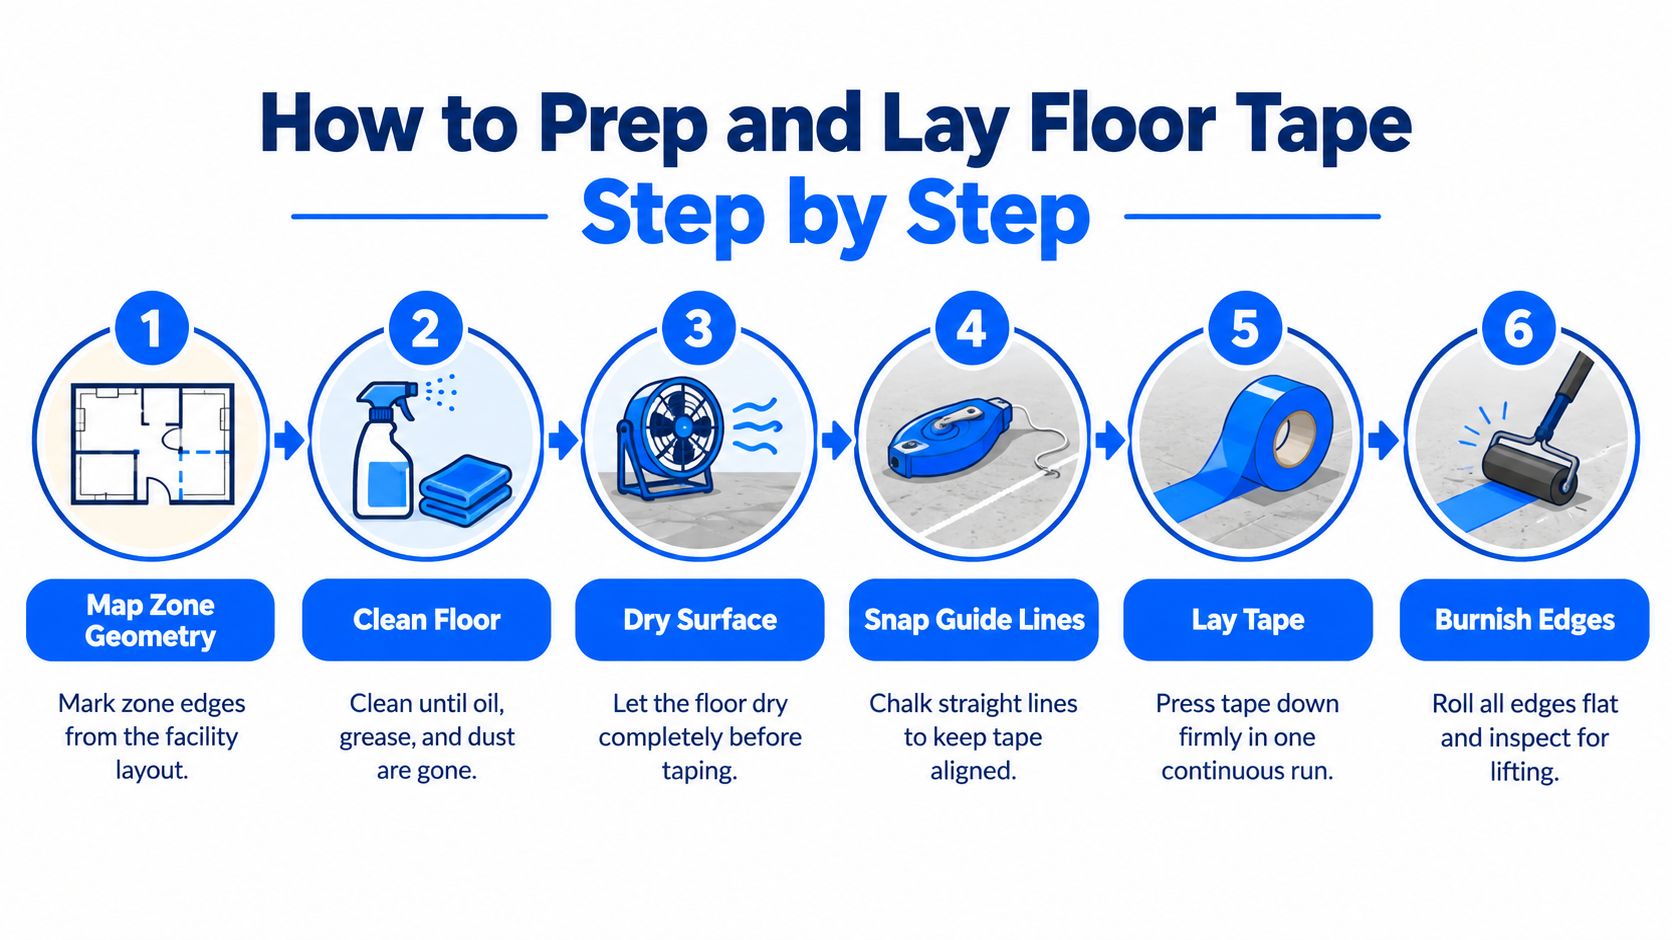
Prepare the floor and prove the bond
-
Map the zone geometry. Mark aisle edges and work-zone footprints from the facility layout. Check doors, equipment access, and crossing points before cleaning an area you may need to move.
-
Clean down to a sound surface. Remove oil, grease, dust, wax, loose coatings, and adhesive residue with compatible cleaning chemicals and floor cleaning machines. Avoid wax-containing cleaners, and remove cleaning residue rather than spreading it along the route.
-
Let the floor dry completely. Damp concrete can weaken the bond even when the surface looks ready. Freshly sealed floors also need attention to coating cure and tape compatibility.
-
Check tape and floor temperature. The 3M Durable Floor Marking Tape 971 application document recommends both at 60 to 80°F (16 to 27°C), and its 19-mil construction illustrates why thickness alone isn't a substitute for preparation. Cold adhesive and cold floors reduce initial bonding and conformability.
-
Run an adhesion test. Apply a short sample to the cleaned surface, roll it firmly, and inspect the edges after controlled traffic exposure. If it lifts, resolve the cause before covering the building.
Our cleaning and janitorial supplies include cleaning chemicals, cleaning supplies, dry wipes, rags and towels, and floor cleaning machines. Choose cleaners that suit the existing floor finish, not just the soil you're removing.
For ongoing care around coated areas, Arelli Cleaning's guide to maintaining sealed concrete floors offers useful cleaning context. Don't strip a sound sealer just to install tape without checking compatibility.
Lay straight runs and finish the edges
-
Snap a chalk line and dry fit. Check the full route before exposing adhesive. Keep loose chalk away from the bonding surface so your alignment aid doesn't become contamination.
-
Apply, roll, and protect the run. Tack one end, then pull the liner away gradually while keeping the tape aligned without stretching it. Use an applicator cart for long runs, consolidate adhesion with a hand or weighted roller, and make butt or miter joints instead of overlapping loose ends.
Wait before opening the lane to traffic for the period specified by the tape manufacturer. Don't substitute a generic wait time for the selected product's instructions.
Unrolled tape, rushed pulling, and a skipped adhesion test are avoidable reasons to repeat the job.
Keep the route closed while you inspect corners and splices. Loose ends give pallet truck wheels and forklift tires a place to catch.
Use the application video as a visual aid alongside the selected tape's installation directions.
Floor Tape Layouts for 5S Workplaces
A marked pallet position shows the next person where the pallet belongs and where it must not extend. A useful 5S layout gives tools, carts, pallets, and bins defined homes rather than outlining every open patch of floor.
Mark pallet positions, cart parking, workstation outlines, scrap and inspection spots, and staging areas. Use corners where a footprint is enough and continuous lines where workers need a boundary they can follow.
The example below shows how placement markings can separate storage footprints from nearby restricted areas.
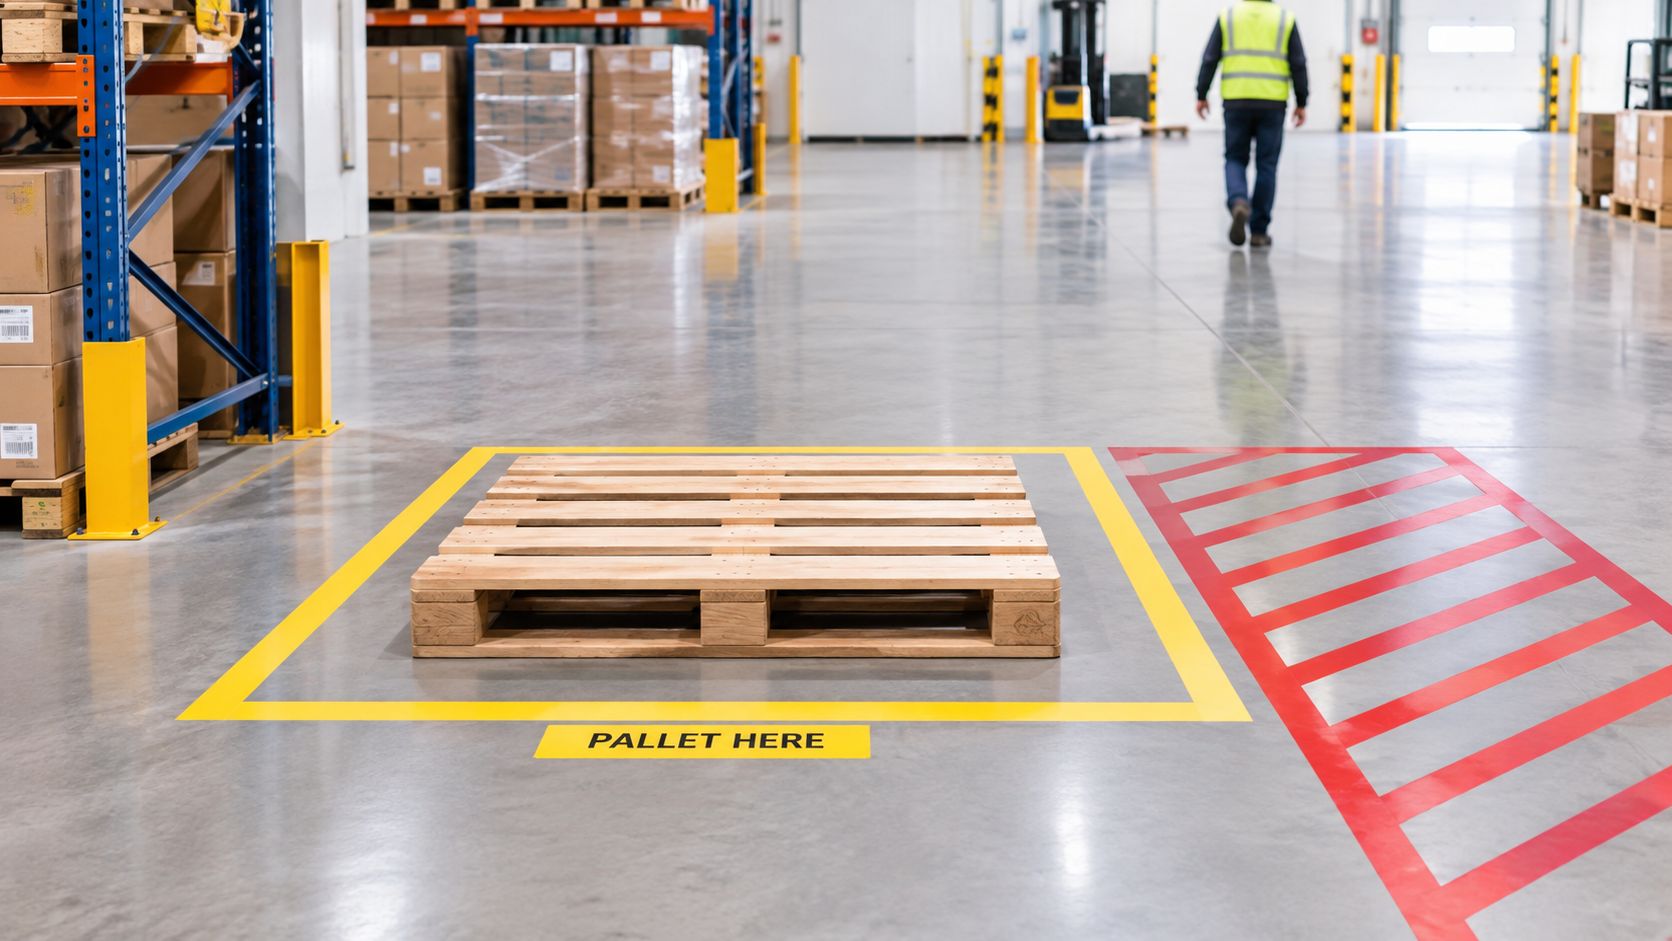
Measure the layout before ordering
The Visual Workplace 5S method guide describes 50 millimeter tape, about 1.97 inches wide, as a visual-workplace practice. Treat that as a planning reference, not a universal OSHA requirement.
Record:
- Total line length.
- Corner count.
- Pallet footprint.
- Number of locations.
Use those measurements to build a case or pallet order. Allow for planned repairs without guessing at roll quantities.
Pair boundaries with 5S storage labels and signs when color alone won't identify the location. Mappedin's explanation of warehouse floor plan visualization can help you review how zones and travel paths fit together before installation.
Choose solid lines for easy-to-follow boundaries and striped tape for a distinct restricted edge or hazard. Keep meanings consistent with the written legend, and assess antislip tape options separately wherever footing needs attention.
Revise the layout when process flow, rack locations, or equipment paths change. An empty box painted into the wrong place is still the wrong place.
Shop Floor Tape Tools and Supplies in Stock
A tape order can fail even when the layout is right: the wrong applicator slows installation, or a substitute product peels under traffic. Keep the approved width, material, pattern, and quantity together so purchasing can match each zone to its intended use.
- Tape and installation tools: Browse floor marking tape, shapes, and applicators for options that fit the approved layout.
- Location identification: Use 5S storage and labeling supplies alongside marked zones when color alone is not enough to identify a location.
- Grip at transitions: Choose antislip tape and stair treads where a marked edge meets a stair or ramp.
Confirm the SKU before checkout
Match the selected width and traffic rating to a specific SKU. Check roll length, thickness, application temperature, floor compatibility, removal guidance, and the manufacturer's traffic wait time before ordering.
Keep the approved product details with the site legend so repeat orders maintain the same construction. Use available volume pricing for repeat orders, but prove the product on your floor before buying project quantities.
Floor Tape Questions Answered Before You Order
Can I remove floor tape without damaging the floor?
Removal can affect a floor, depending on its surface and the tape adhesive. Check the product's removal guidance, test a discreet area, and use a floor-compatible cleaner if adhesive remains.
How much tape is on a roll?
Roll length varies by product, so check the specific SKU before calculating quantities. Add the measured line lengths, then allow for corners, splices, and repair stock.
Does tape work on uneven or textured floors?
Tape bonds best to flat, sound, sealed concrete with a compatible finish. Rough or textured surfaces reduce contact, which can weaken adhesion at the edges. Check the product specifications and test a sample before marking the full area.
How often should marked lines be checked?
Set inspection frequency to match traffic: busy routes may need checking each shift, while quieter areas may need less frequent checks. Assign an owner, and inspect markings whenever equipment or storage locations move.
When should worn tape be replaced?
Replace tape when edges lift, corners curl, or fading makes boundaries difficult to see. Remove obsolete lines after a route change so workers are not left choosing between competing markings.
Where do antislip products fit?
Use antislip tape or treads where a marked route meets a stair, ramp, or wet step. They add grip, but do not replace drainage, housekeeping, or suitable footwear.
Material Handling USA provides buying guides and planning tools to help with product selection. For floor marking products, compare the options in the floor marking tape category.
Shop the floor marking tape category, or reach a U.S. product specialist by phone for pallet quantities, custom sizes, or a quote on a project-size order.
Material Handling USA is based in Salt Lake City and serves businesses nationwide. Its catalog includes in-stock products and volume pricing. Visit Material Handling USA to find floor marking tape, application tools, and supporting facility supplies.